Welcome to the fifth of our Watercolour Fundamentals Newsletters.
When we first start painting, we all have a natural tendency to focus on the subjects and ‘things’ in the composition. Trees, houses, flowers, boats—whatever the subject, that's our main focus.
But what really gives a painting mood and definition isn’t just the objects themselves. It’s the edges between them.
- Soft and gentle edges suggest distance, mist, and calm.
- Crisp, hard edges create focus and detail.
- “Lost” edges, where shapes melt into one another and borders are blurred, create mystery and atmosphere.
Once you start paying attention to edges, your paintings can feel softer, deeper, and more intentional, without becoming fussy.
Types of Edge (yes, there are distinct types!)
In watercolour, you’ll mostly work with three kinds of edges:
- Soft edges are where one colour gently blends into another over a nice gradual gradient.
- Hard edges are where one shape clearly stops and another begins.
- Lost edges are where part of a shape disappears into its surroundings.
Each brings its own feeling to the overall painting.
Soft edges are wonderful for: - Distant trees and hills
- Skies and clouds
- Reflections in water
- Soft shadows
They help things recede and feel further away and make for a more diffuse focus.
Hard edges are useful for: - Foreground objects
- Windows, doors, and rooflines
- Tree trunks and branches
- Flower centres and sharp petals
They help things stand out and draw the eye, especially when combined with good use of values.
Lost edges - Misty mornings
- Edges in shadow
- Areas you don’t want to over-explain
They add a sense of atmosphere and prevent the painting from feeling too “outlined”.
Controlling Edges in Watercolour
Edge control in watercolour is all about timing and moisture. For example:
- Paint onto wet or damp paper and the paint will spread and diffuse to create softer edges.
- Paint straight onto dry paper and you will create harder edges.
- Soften an edge just as it's losing its shine and is beginning to dry and you can create beautiful, controlled transitions.
Fingertip test:
If the paper feels cool and slightly tacky, it's damp and perfect for softening edges.
If it feels dry and room temperature, it's perfect for those crisp, sharp marks.
A Simple Exercise for Soft and Hard Edges
- Paint a medium-strength rectangle of colour.
- While it’s still shiny-wet, paint another colour right up against one side and let them flow together – that side will have a very soft edge.
- On another side, wait until the first rectangle is just damp, then paint a second colour next to it – you’ll get a controlled soft edge.
- Once the first rectangle is completely dry, paint a third colour right next to it – that side will have a hard edge.
You’ve just created a little “edge chart” showing how timing changes everything.
How to Soften an Edge
Sometimes you paint a line or shape and realise it’s too harsh. Here’s a gentle way to soften an edge:
- Rinse your brush and blot it so it’s damp, not dripping.
- Place the damp brush on the clean paper just next to the edge you want to soften.
- Gently pull along the edge, letting a little of the colour bleed into the damp area.
- Wipe the brush, repeat if needed.
This works best when the paint is still slightly damp, not bone dry. If it’s completely dry, you can still soften it a little, but the effect will be more subtle.
Using Edges in Your Paintings
Unless you are deliberately trying to create a super soft or super sharp image, it’s best to ensure a mix of both sharp and soft edges in your painting to create interest.
As a general guidance, try and build sharper edges near your focal point and lean towards softer edges in the background and less important areas.
- In a floral painting, keep the centre of the main flower crisp, while petals further away are softer.
- In a landscape, keep the cottage and nearby tree trunks sharp, while distant trees and hills are soft and hazy.
This gently guides the viewer’s eye to where you want them to look.
How Terry and Fiona Use Edges
In the Terry Harrison film library, you’ll see Terry:
- Painting skies and distant hills with beautifully soft edges
- Keeping foreground details – like fences, boats, and cottages – sharper
- Using lost edges in misty scenes and reflections to suggest detail without over-painting
In Fiona Peart’s courses, you’ll notice: - Soft, delicate edges in petals and backgrounds to keep florals light and airy
- Sharper accents in flower centres, stems, and key leaves to create focus
- Occasional lost edges where petals blend into the background, adding a sense of softness and depth
Watching how they handle edges is one of the quickest ways to understand how atmosphere is created in watercolour.
Would You Like to Practise Edges with Step-by-Step Guidance?
Edges can feel subtle at first, but once you see them demonstrated clearly, they become one of your most powerful tools.
-
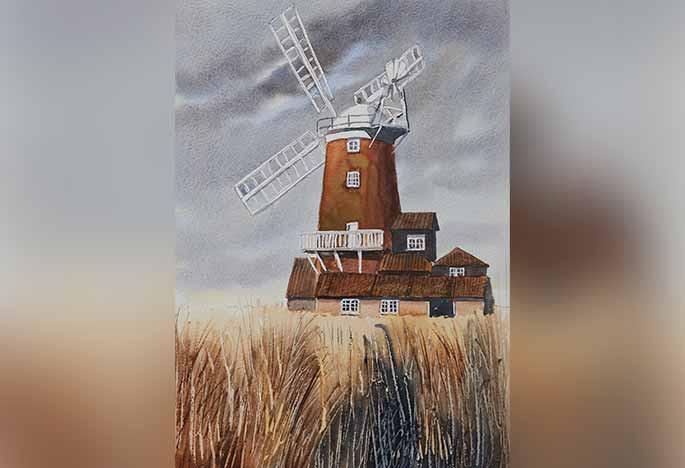
Choose a sky or misty landscape from the Terry Harrison film library and pay close attention to where edges are soft, hard, or lost. A good example is Cley Windmill, which you can access for free for the next week
here.
-
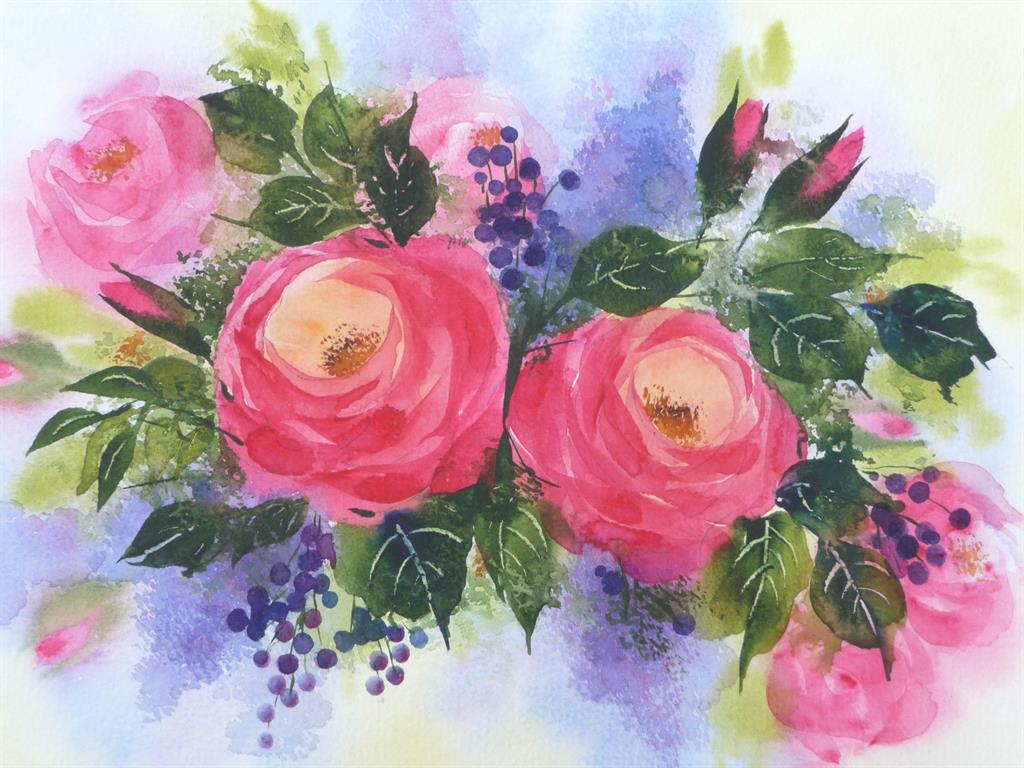
Or select one of Fiona Peart’s floral lessons and watch how she softens backgrounds while keeping key details crisp. A good example is her Simplified Flowers, which you can view for free
here.
- Keep a small practice sheet beside you and copy the edges you see – not just the shapes.
If you’d like your paintings to feel more atmospheric and less “outlined,” visit the Terry Harrison film library or Fiona Peart’s courses and pick a beginner-friendly lesson that features skies, mist, or florals. With a little focused practice on soft, hard, and lost edges – and a good quality brush from our range – you’ll find your watercolours gaining depth and mood without becoming complicated.
Happy Painting!
Martin